
The Agent turns a fixed computer into an alerting device for the room it sits in. This guide is the single manual install — for a lab, a block or a whole estate, use Deploy Agents at scale with Intune instead, because this installer is per Windows account and that one is per machine.
Before you start
Have these ready.
- On Windows: administrator rights once, for the certificate step. The installer itself needs none.
- On macOS: an administrator account for the first launch.
- A MassComs admin email and password to sign in with in the Setup window.
- Outbound HTTPS from the machine to admin.masscoms.com.
- 01
Download the right installer
Open Agent Setup → Desktop Agent. The Windows tab offers 1. Install certificate, 2. Windows (.exe) and, since agent 0.6.2, an optional Windows (.msi). The macOS tab offers macOS (.dmg). The card shows the current version — Latest: v0.6.2 at the time of writing.
Downloads are named consistently: agent-0.6.2-x64.exe, agent-0.6.2-x64.msi and agent-0.6.2-universal.dmg. The 0.6.2 release is about 45% smaller than earlier builds.
The .exe installs for the Windows account that runs it. On a shared or lab PC where several accounts sign in, that is the wrong installer — the Mass Deployment tab's per-machine build installs once for every user.
The .msi exists for device-management tooling that specifically expects a Windows Installer package (some GPO and RMM products). It is a plain installer: it does not carry a deployment token, is not what Intune should be given, and does not self-update. Most people want the .exe.
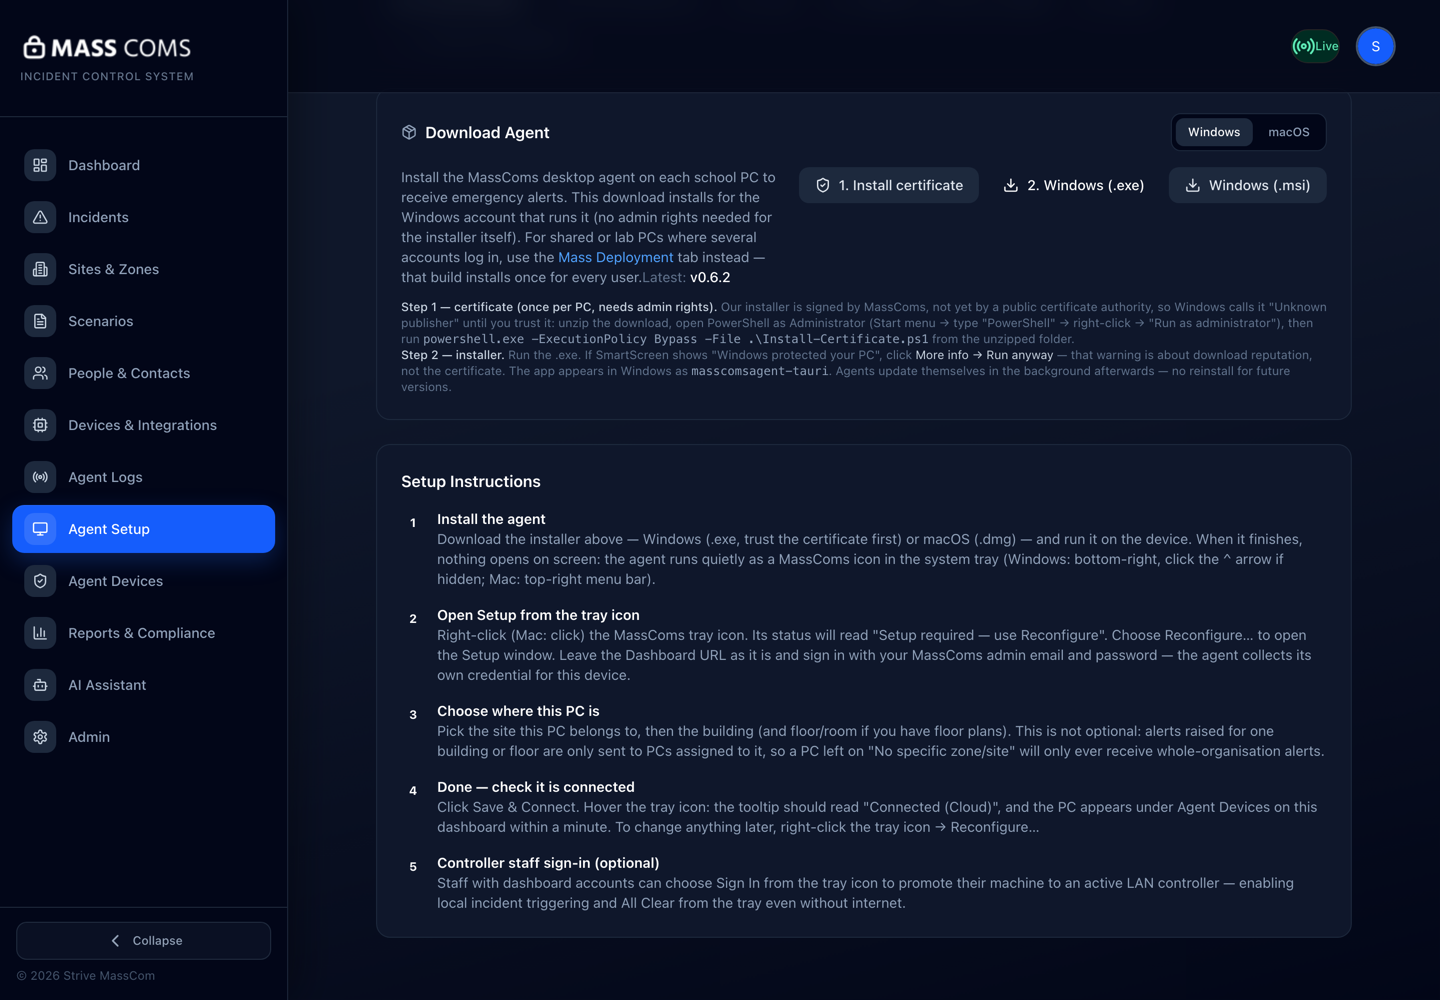
Agent Setup — Desktop Agent tabMassComs Agent Setup page, Desktop Agent tab, showing the certificate, Windows .exe and .msi downloads with the latest version. - 02
Windows: trust the certificate first
The installer is signed by MassComs, not yet by a public certificate authority, so Windows calls it Unknown publisher until the certificate is trusted. Do this once per PC, as administrator, before running the installer.
- Download 1. Install certificate (MassComs-Certificate-Setup.zip) and unzip it.
- Start menu → type PowerShell → right-click → Run as administrator.
- In the unzipped folder run: powershell.exe -ExecutionPolicy Bypass -File .\Install-Certificate.ps1
If SmartScreen still shows Windows protected your PC when you run the .exe, click More info → Run anyway. That warning is about download reputation, not the certificate.
Do not train staff to click through publisher warnings. Install the certificate so the warning never appears.
- 03
Run the installer
Windows: run the .exe. It installs for the current account and appears in Windows as masscomsagent-tauri. macOS: open the .dmg and drag masscomsagent-tauri into Applications, then open it once as an administrator; it starts at login for that account afterwards.
The Mac build is not yet notarised with Apple, so the first double-click shows Apple could not verify masscomsagent-tauri. Close that message, open System Settings → Privacy & Security, scroll down and click Open Anyway, then confirm. Only needed once.
When the install finishes, nothing opens on screen. The Agent runs quietly as a MassComs icon in the system tray — Windows bottom-right (click the ^ arrow if it is hidden), Mac top-right menu bar.
- 04
Open Setup from the tray icon and sign in
Right-click (Mac: click) the MassComs tray icon. Its status reads Setup required — use Reconfigure. Choose Reconfigure… to open the Setup window. Leave the Dashboard URL as it is, enter your admin email and password, and click Connect.
The Agent collects its own credential for this device during that sign-in. Each device gets a separately revocable credential, which is why an Agent can be revoked on its own from Agent Devices without touching anything else.
Field or control What it does Dashboard URL Pre-filled with https://admin.masscoms.com. Leave it. Admin email / Password A MassComs account that can sign in to the dashboard. It is used once; the Agent does not keep the password. Check for updates Also in this window — forces an update check instead of waiting for the background one. Never type the Connector Secret from the Connector Integration tab into an Agent. It is for connector REST integrations only; AgentHub does not accept it, and an Agent set up with it will never connect.
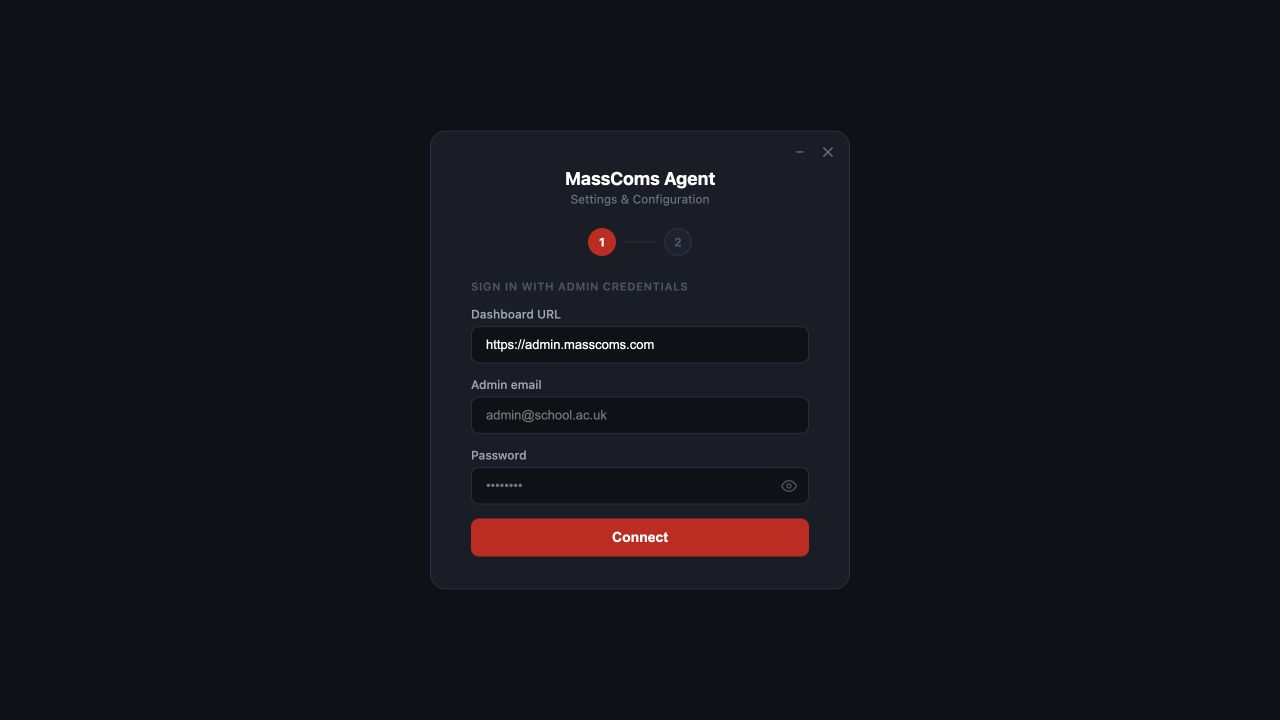
Agent Setup window — sign inMassComs Agent Setup window showing the Dashboard URL, admin email and password fields. - 05
Choose where this PC is
After sign-in the Setup window asks for the location. The site is detected automatically (use Change site if it is wrong), then pick the building, floor, room and space where you have them. Click Save & Connect.
This is not optional. An incident raised for one building or floor is only sent to PCs assigned to it, so a PC left on No specific zone/site (all-org alerts) only ever receives whole-organisation alerts and can never be given a room-specific route.
Skip — receive all alerts exists for a machine that genuinely moves around. Do not use it to save time; come back with Reconfigure… later instead.
See Assign an Agent to a site and room for what each level does.
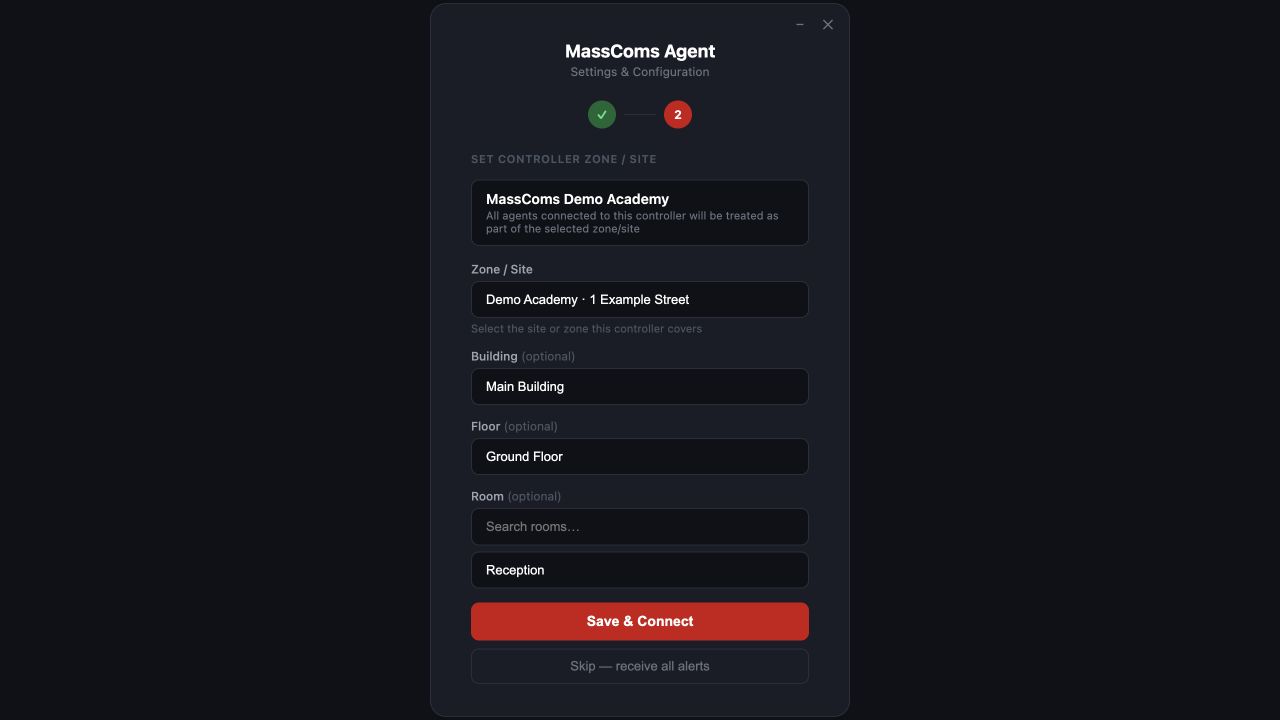
Agent Setup window — locationMassComs Agent Setup window showing site, building, floor and room selection. - 06
Confirm it is connected
Hover the tray icon: the tooltip reads MassComs — Connected (Cloud) (v0.6.2). On the dashboard, Agent Devices → Enrolled Devices lists the PC by hostname within a minute, with its location, Connection state, Version and Last seen.
Confirm it workedThe row shows the location you set, not org-wide, and Last seen is seconds ago. To change anything later: right-click the tray icon → Reconfigure….
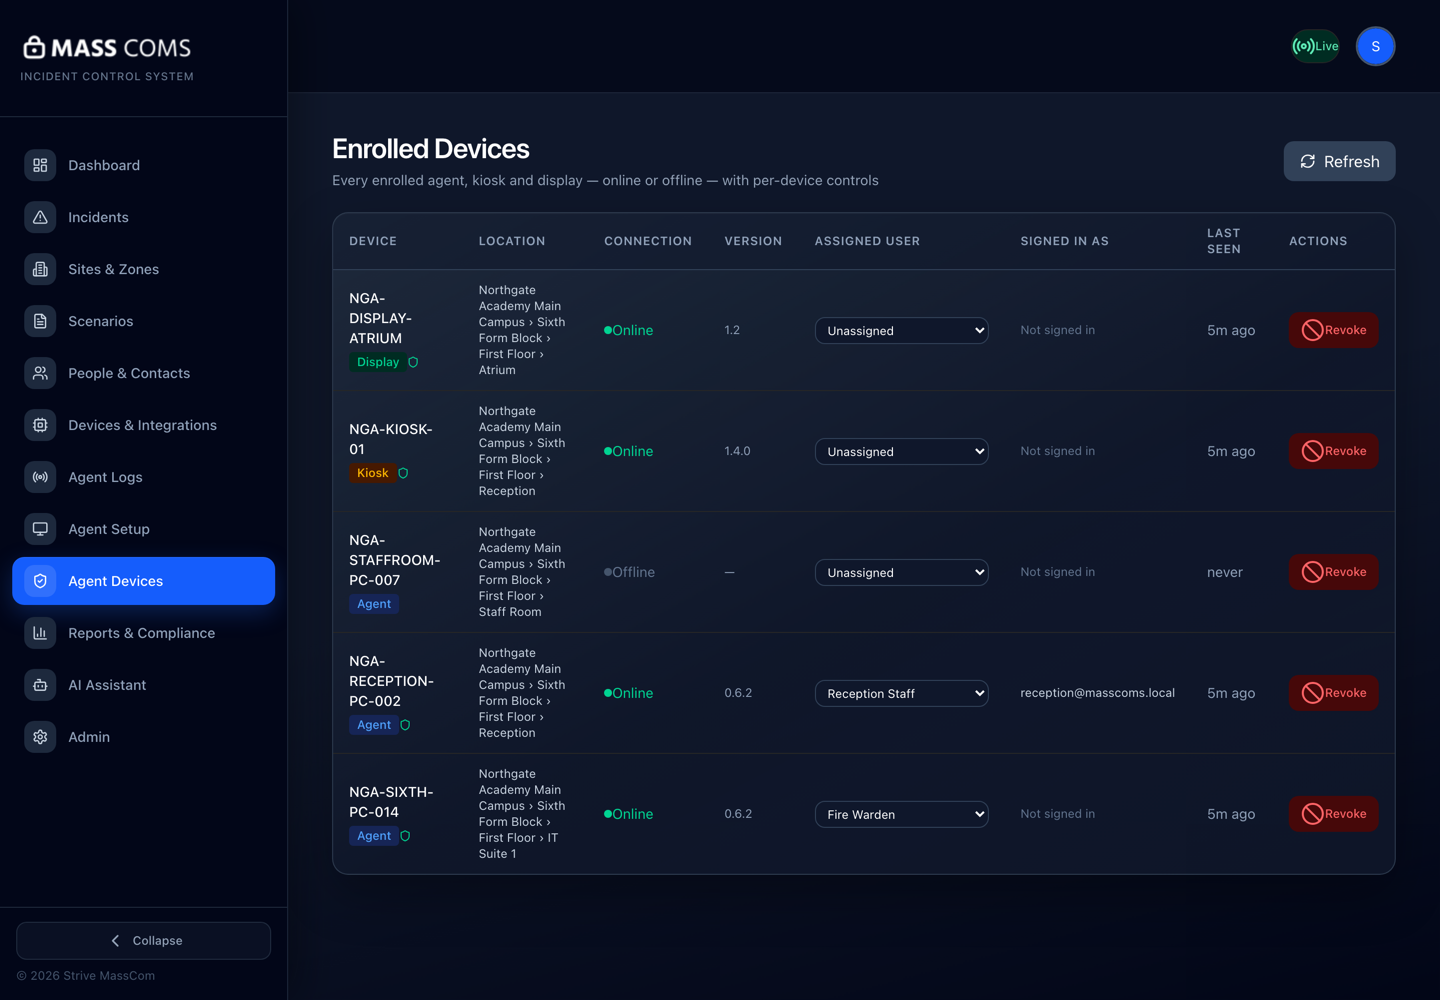
Agent Devices — Enrolled DevicesMassComs Agent Devices page listing enrolled devices with location, connection, version, assigned user, signed-in user and last seen. - 07
Optional: promote it to a LAN controller
Staff with a dashboard account can choose Sign In from the tray menu. The machine becomes an active LAN controller — the status changes to Active Controller and Trigger Incident… is enabled in the tray — so incidents and the All Clear can be raised locally even without internet.
The dashboard's Agent Devices page shows who is signed in on each device in the Signed in as column. Sign Out from the same menu returns it to a plain Agent.
- 08
Test with a narrow TEST incident
Run a TEST-type incident scoped to that room's building or floor and confirm the Agent sounds and shows its overlay. Do this while standing at the machine.
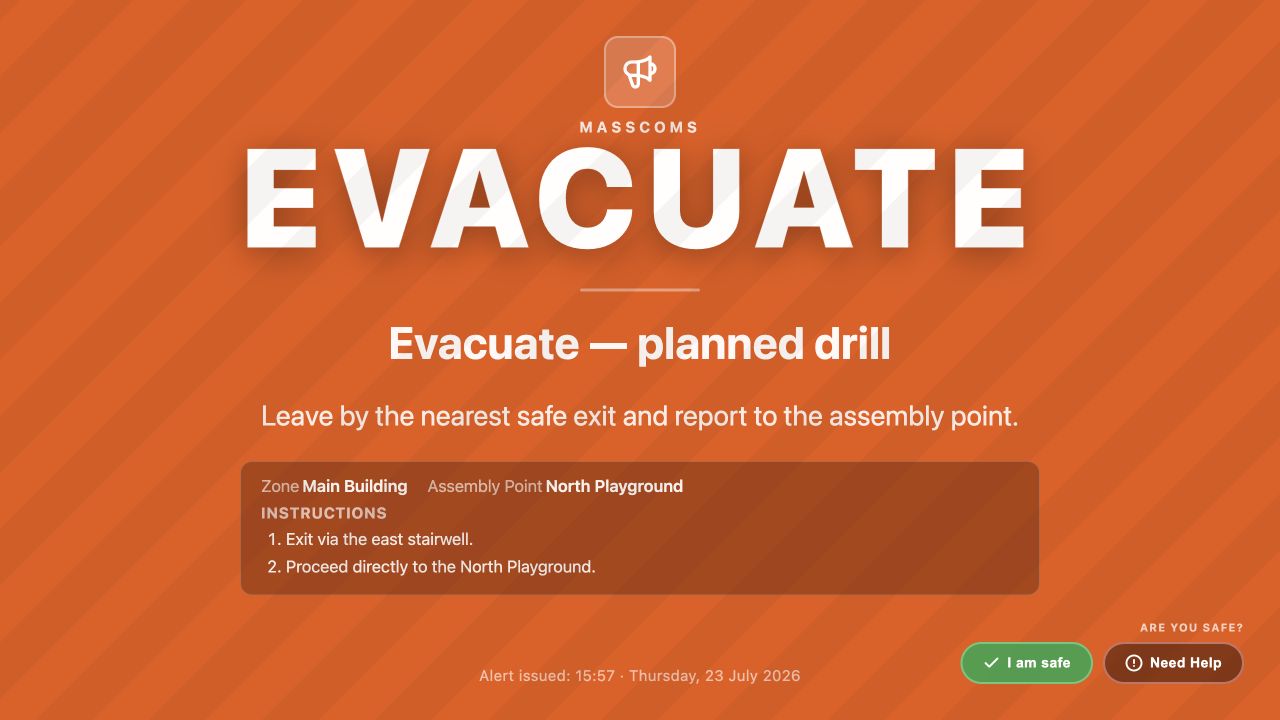
Agent emergency overlayMassComs Agent showing its full-screen emergency overlay.
Troubleshooting
When it does not go to plan.
| Symptom | Usual cause | Fix |
|---|---|---|
| Windows shows Unknown publisher. | The MassComs certificate has not been trusted on this PC. | Run Install-Certificate.ps1 as administrator, then run the installer again. |
| SmartScreen: Windows protected your PC. | Download reputation, not the certificate. | More info → Run anyway. |
| macOS: Apple could not verify masscomsagent-tauri. | The Mac build is not yet notarised. | System Settings → Privacy & Security → Open Anyway, once. |
| No tray icon after installing on Windows. | The .exe is per account — it was installed under a different Windows login, or the icon is behind the ^ arrow. | Check the tray overflow first. For a shared PC, uninstall and use the Mass Deployment per-machine build. |
| The Setup window rejects the sign-in. | Wrong dashboard URL, or an account that is not an active member of this organisation. | Confirm the same email and password sign in to the dashboard, and that the Dashboard URL was left as https://admin.masscoms.com. |
| Installed and signed in, but never appears in Agent Devices. | Outbound HTTPS is blocked or a domain filter is in the way. | Allowlist admin.masscoms.com, masscoms.lon1.digitaloceanspaces.com and api.elevenlabs.io at the network edge. |
| It enrolled with the wrong location. | The wrong site or room was picked in Setup. | Right-click the tray icon → Reconfigure… and pick again. The change saves to the cloud; no reinstall. |
Good to know
Small details that prevent big confusion.
- A manually installed Agent updates itself in the background — no reinstall for future versions. Agents installed through Intune do not (see Deploy Agents at scale).
- One .exe install covers one Windows account. That is the whole reason the per-machine build exists.
- An Agent with no location is a bell with no address: it hears whole-organisation alerts and nothing scoped.
Was this guide clear?